User Guide
BizBook (BB) is a desktop app for managing contacts, optimized for use via a Command Line Interface (CLI) while still having the benefits of a Graphical User Interface (GUI). If you can type fast, BB can get your contact management tasks done faster than traditional GUI apps.
Table of Contents
- Quick start
-
Features
2.1 Viewing help :help
2.2 Adding a person:add
2.3 Listing all persons :list
2.4 Editing a person :edit
2.5 Locating persons by name:find
2.6 Deleting a person :delete
2.7 Delete a tag of an existing contact:deletetag
2.8 Add a note to an existing contact:addnote
2.9 Edit a note of an existing contact:editnote
2.10 Deleting a note from an existing contact:deletenote
2.11 View an existing contact’s details :view
2.12 Pin a contact:pin
2.13 Unpin a contact:unpin
2.14 Undo a previously executed command:undo
2.15 Redo a previously executed undo command:redo
2.16 Import a contact list :import
2.17 Export the contact list :export
2.19 Change the application’s theme :toggle
2.20 Clear all entries :clear
2.21 Exit the program :exit
2.22 Saving the data
2.23 Editing the data file
- FAQ
- Known issues
- Command summary
Quick start
-
Ensure you have Java
17or above installed in your Computer. -
Download the latest
.jarfile from here. -
Copy the file to the folder you want to use as the home folder for your BizBook.
-
Open a command terminal,
cdinto the folder you put the jar file in, and use thejava -jar bizbook.jarcommand to run the application.
A GUI similar to the below should appear in a few seconds. Note how the app contains some sample data.
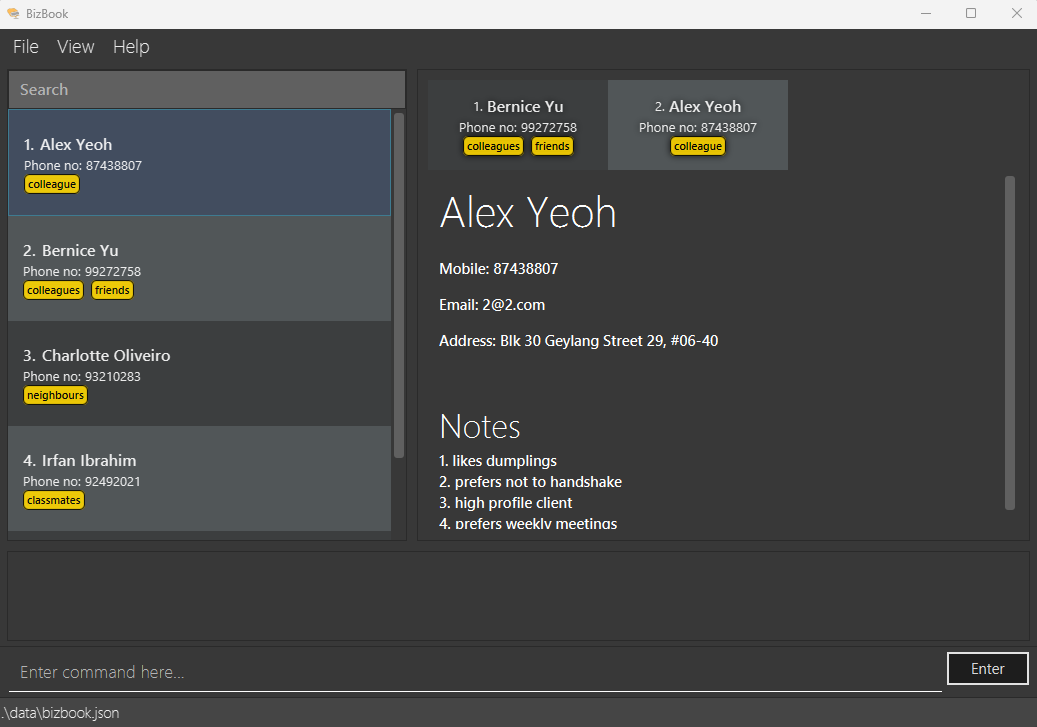
-
Type the command in the command box and press Enter to execute it. e.g. typing
helpand pressing Enter will open the help window.
Some example commands you can try:-
list: Lists all contacts. -
add n/John Doe p/98765432 e/johnd@example.com a/John street, block 123, #01-01: Adds a contact namedJohn Doeto the Address Book. -
delete 3: Deletes the 3rd contact shown in the current list. -
clear: Deletes all contacts. -
exit: Exits the app.
-
-
Refer to the Features below for more commands and the details of each command.
Features
![]() Notes about the command format:
Notes about the command format:
-
Words in
UPPER_CASEare the parameters to be supplied by the user.
e.g. inadd n/NAME,NAMEis a parameter which can be used asadd n/John Doe. -
Parameters are composed only of letters.
e.g.nfor the name parameter orpfor the phone number parameter. Numbers are not valid parameter names. -
Parameters in square brackets are optional.
e.gn/NAME [t/TAG]can be used asn/John Doe t/friendor asn/John Doe. -
Parameters with
… after them can be used multiple times including zero times.
e.g.[t/TAG]…can be used ast/friend,t/friend t/familyetc. -
Parameters can be in any order.
e.g. if the command specifiesn/NAME p/PHONE_NUMBER,p/PHONE_NUMBER n/NAMEis also acceptable. -
Command keywords are case-insensitive.
e.g.addandADDare both acceptable. -
Extraneous parameters for commands that do not take in parameters (such as
help,list,exitandclear) will be ignored.
e.g. if the command specifieshelp 123, it will be interpreted ashelp. -
If you are using a PDF version of this document, be careful when copying and pasting commands that span multiple lines as space characters surrounding line-breaks may be omitted when copied over to the application.
Viewing help : help
Shows a table of basic commands and their usage syntax.
At the bottom, a link is provided to the user guide (where you are now!) which explains each command in greater detail.
If the application is unable to open the URL in the system’s browser due to OS/browser restrictions, the URL will be copied to clipboard instead.
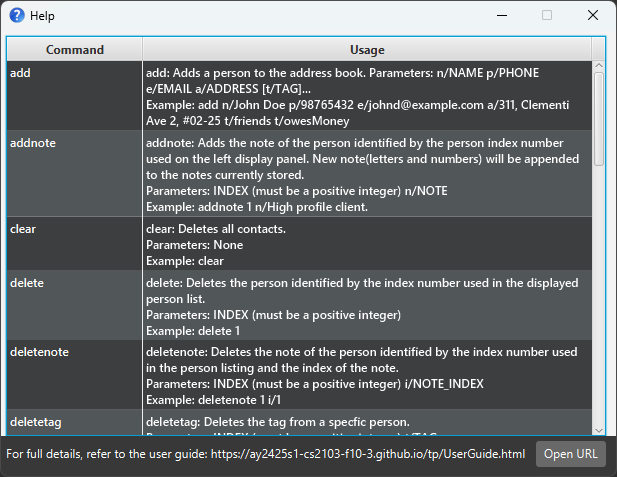
Format: help
Adding a person: add
Adds a person to the address book.
Format: add n/NAME p/PHONE_NUMBER e/EMAIL a/ADDRESS [t/TAG]…
- Note that Name, Phone Number, Email and Address are compulsory fields.
- We believe it is reasonable that a customer or business contacts will need to provide these fields as they are not particularly sensitive as compared to Identification Number etc.
- The email validation does not check for the presence of a period (.) after the “@” symbol, and it does not verify any specific domain extension. It only ensures that the domain name after the “@” is at least two characters long. E.g.
@u.nus.edu
Examples:
add n/John Doe p/98765432 e/johnd@example.com a/John street, block 123, #01-01add n/Betsy Crowe t/friend e/betsycrowe@example.com a/Newgate Prison p/1234567 t/criminal
Listing all persons : list
Shows a list of everyone in the address book.
This is used particularly to undo the effects of a find command. A find command filters the person list . Running
list will result in everyone to be displayed again in the person list.
Format: list
Editing a person : edit
Edits an existing person in the address book.
add command are the same in the edit command.
Format: edit INDEX [n/NAME] [p/PHONE] [e/EMAIL] [a/ADDRESS] [t/TAG]…
- Edits the person at the specified
INDEX. The index refers to the index number shown in the displayed person list. The index must be a positive integer 1, 2, 3, … - At least one of the optional fields must be provided.
- Existing values will be updated to the input values.
- When editing tags, the existing tags of the person will be removed i.e adding of tags is not cumulative.
- You can remove all the person’s tags by typing
t/without specifying any tags after it.
Examples:
-
edit 1 p/91234567 e/johndoe@example.comEdits the phone number and email address of the 1st person to be91234567andjohndoe@example.comrespectively. -
edit 2 n/Betsy Crower t/Edits the name of the 2nd person to beBetsy Crowerand clears all existing tags.
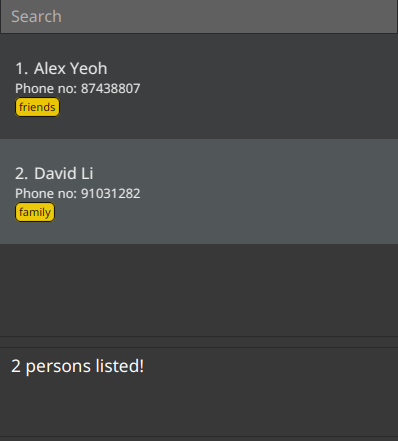
Locating persons by name: find
Finds persons whose names contain any of the given keywords.
Format: find KEYWORD [MORE_KEYWORDS]
- The search is case-insensitive. e.g
hanswill matchHans - The order of the keywords does not matter. e.g.
Hans Bowill matchBo Hans - Only the name is searched.
- Partial words will be matched e.g.
Hanwill matchHans - Persons matching at least one keyword will be returned (i.e.
ORsearch). e.g.Hans Bowill returnHans Gruber,Bo Yang
Examples:
-
find Johnreturnsjohn,John DoeandJohnny -
find alex davidreturnsAlex Yeoh,David Li
Result from find alex david:
Deleting a person : delete
Deletes the specified person from the address book.
Format: delete INDEX
- Deletes the person at the specified
INDEX. - The index refers to the index number shown in the displayed person list.
- The index must be a positive integer 1, 2, 3, …
Examples:
-
listfollowed bydelete 2deletes the 2nd person in the address book. -
find Betsyfollowed bydelete 1deletes the 1st person in the results of thefindcommand.
Delete a tag of an existing contact: deletetag
Deletes a tag from a person in the address book.
Format: deletetag INDEX t/TAG
- Deletes the
TAGfor the person at the specifiedINDEX. - The index refers to the index number shown in the displayed person list.
- The index must be a positive integer 1, 2, 3, …
- The tag must be a existing tag on the person.
Examples:
-
deletetag 1 t/friendswill delete the tagfriendsfrom the first person in the person list. -
deletetag 2 t/Clientwill delete the tagClientfrom the second person shown in the person list.
Add a note to an existing contact: addnote
Adds a note to a person in the address book.
A contact’s notes can be viewed by clicking on the contact in the person list.
Format: addnote INDEX n/NOTE
- Add note to the person at the specified
INDEX. - The index refers to the index number shown in the displayed person list.
- The index must be a positive integer 1, 2, 3, …
- The note must be comprised of alphanumeric characters or spaces.
- Duplicate notes are not allowed. E.g.
High profile clientis treated the same ashigh profile client - Notes are stored as case-sensitive but are case-insensitive when duplicate check is done.
- Only one note may be added at a time. E.g.
addnote 1 n/High profile client. Ifaddnote 1 n/Supplier 1 n/Supplier 2is input, only the far right note will be added. If one wishes to add notes quicker, he/she may simply use the up-arrow feature to quickly re-enter the command as it requires fewer keystrokes than typing an additionaln/.
Examples:
addnote 1 n/Supplier 1addnote 2 n/Supplier 2
Edit a note of an existing contact: editnote
Edits a note of a person in the address book.
Format: editnote INDEX i/NOTE_INDEX n/NOTE
- Edits the note at the specified
NOTE_INDEXof the person at the specifiedINDEX. - The index (i.e.
INDEX) refers to the index number shown in the displayed person list. - The note index (i.e.
NOTE_INDEX) refers to the index number shown in the notes list of the contact details of the displayed person. - The index and note index must be positive integers 1, 2, 3, …
- The note must be comprised of alphanumeric characters or spaces.
- Duplicate notes are not allowed. E.g.
High profile clientis treated the same ashigh profile client - Notes are stored as case-sensitive but are case-insensitive when duplicate check is done.
- Only one note may be edited in each command. The behaviour is similar to that of
addnote.
Examples:
editnote 1 i/1 n/Customer 1editnote 2 i/1 n/Customer 2
Deleting a note from an existing contact: deletenote
Deletes a note from a person in the address book.
Format: deletenote INDEX i/NOTE_INDEX
- Delete a note from the person at the specified
INDEXand specifiedNOTE_INDEX. - The index (i.e.
INDEX) refers to the index number shown in the displayed person list. - The note index (i.e.
NOTE_INDEX) refers to the index number shown in the notes list of the contact details of the displayed person. - The index and note index must be positive integers 1, 2, 3, …
- Only one note may be deleted in each command. The behaviour is similar to that of
addnote.
Examples:
deletenote 1 i/1deletenote 2 i/2
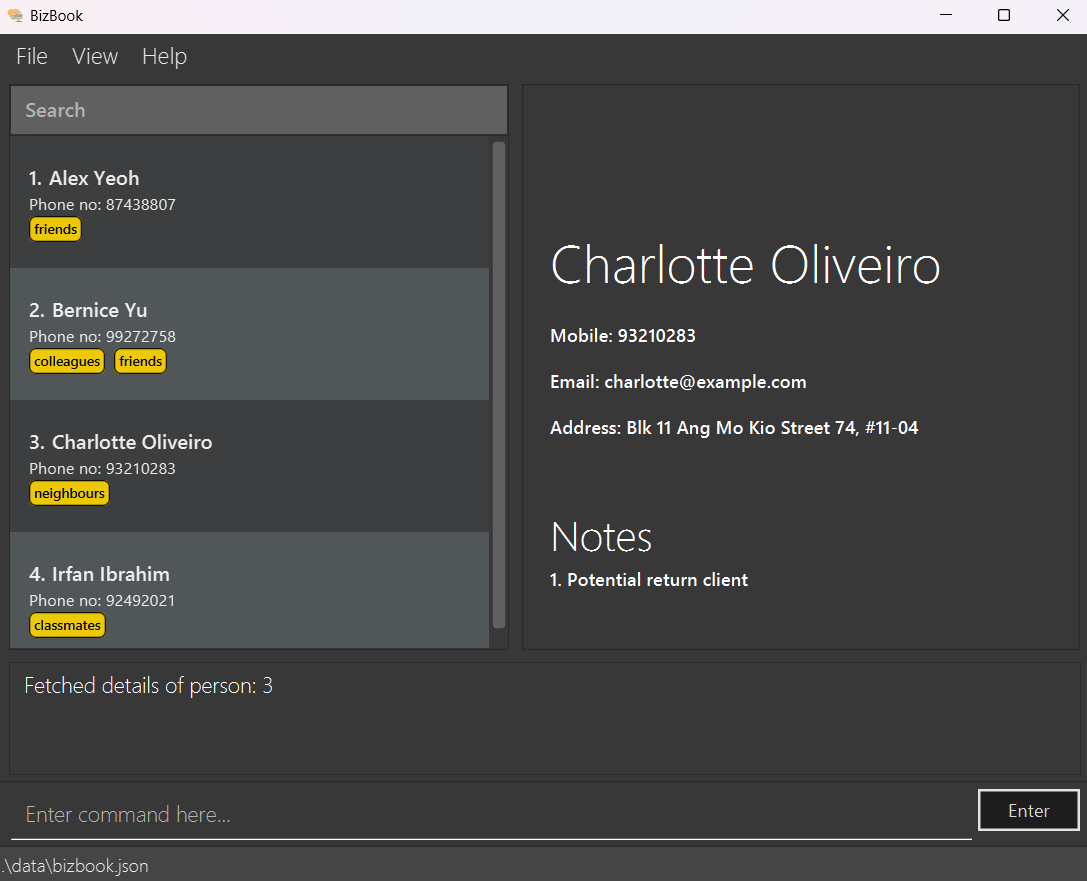
View an existing contact’s details : view
Views the details of a person in the address book.
Format: view INDEX
- Views the details of the person at the specified
INDEX. - The index refers to the index number shown in the displayed person list.
- The index must be a positive integer 1, 2, 3, …
- The index must be within the range shown on the displayed person list.
Examples:
-
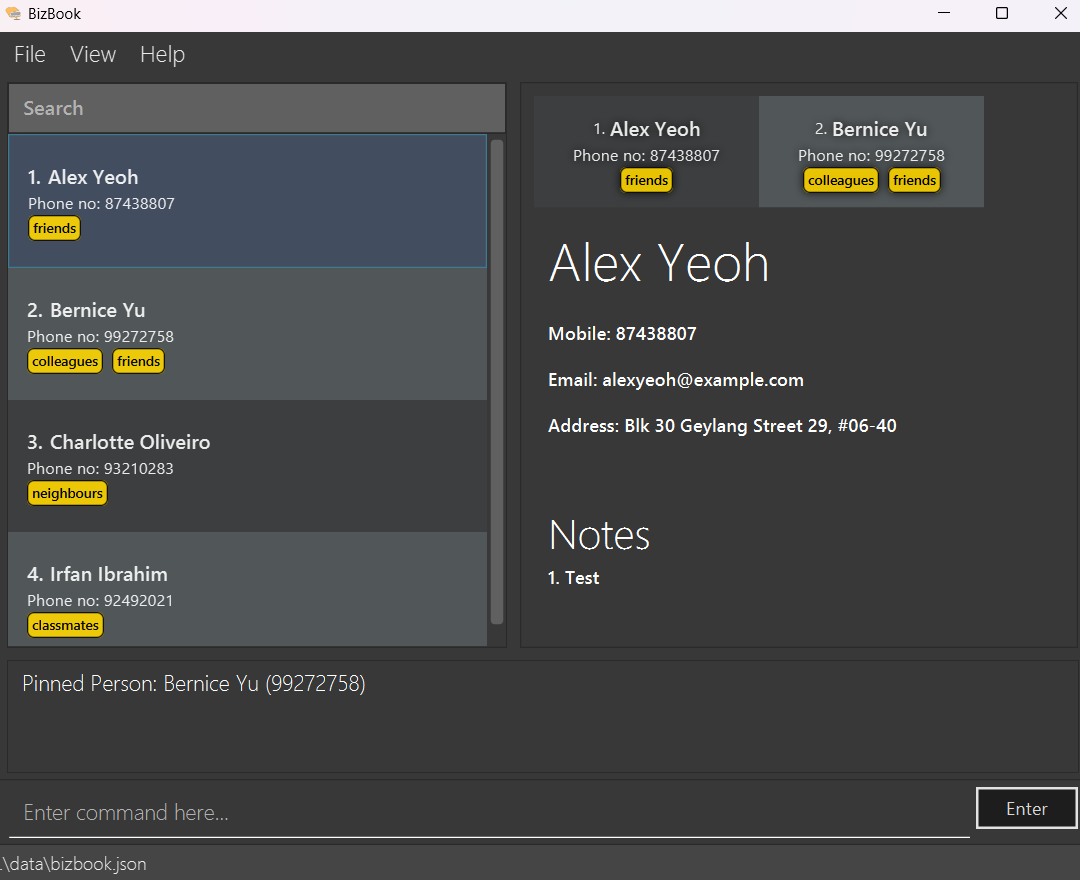
view 1shows the contact details of the first person shown on the displayed person list. view 3
Result from view 3:
Pin a contact: pin
Pins the contact of a person into a dedicated panel.
Format: pin INDEX
- Pin the contact of the person at the specified
INDEX. - The index refers to the index number shown in the displayed person list, not the pinned list.
- The index must be a positive integer 1, 2, 3, …
- The index must be within the range shown on the displayed person list.
Examples:
-
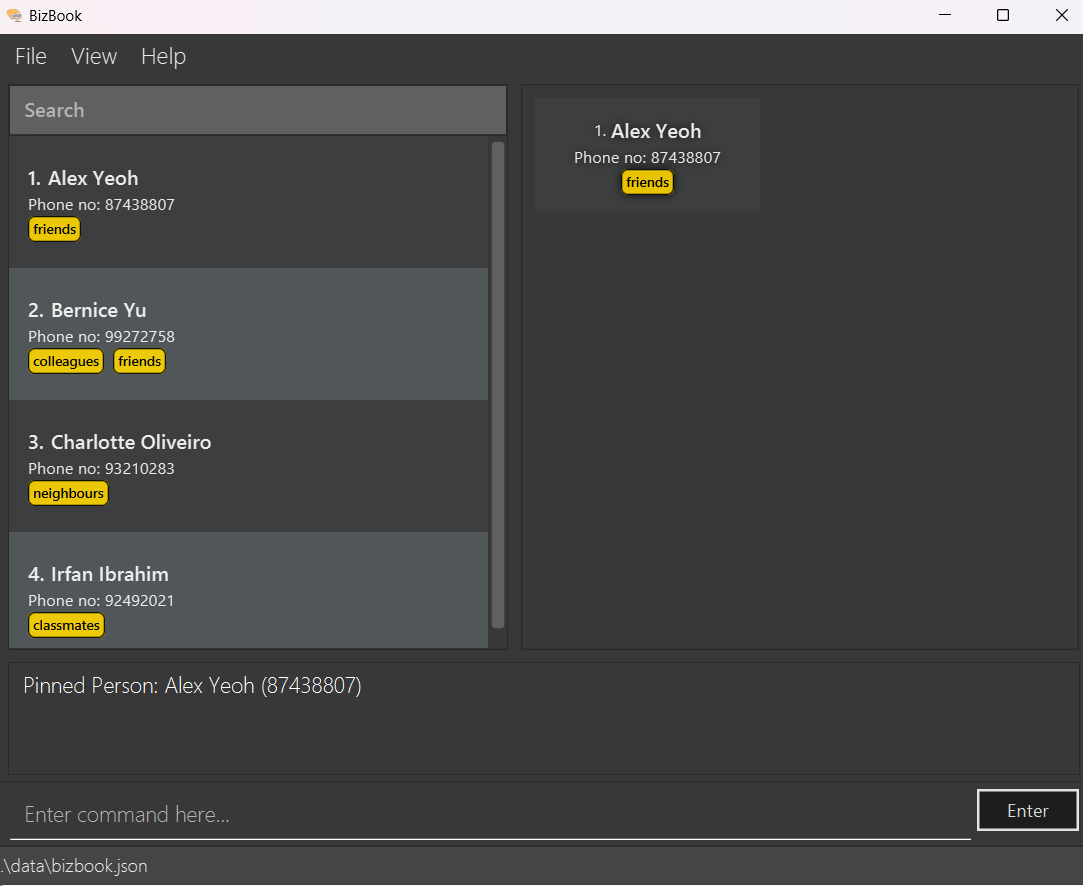
pin 1pins the contact of the first person shown on the displayed person list into the pinned person list.
Result from pin 1:
Unpin a contact: unpin
Unpins the contact of a person from the pinned list.
Format: unpin INDEX
- Unpin the contact of the person at the specified
INDEX. - The index refers to the index number shown in the pinned list, not the displayed person list.
- The index must be a positive integer 1, 2, 3, …
- The index must be within the range shown on the pinned list.
Examples:
-
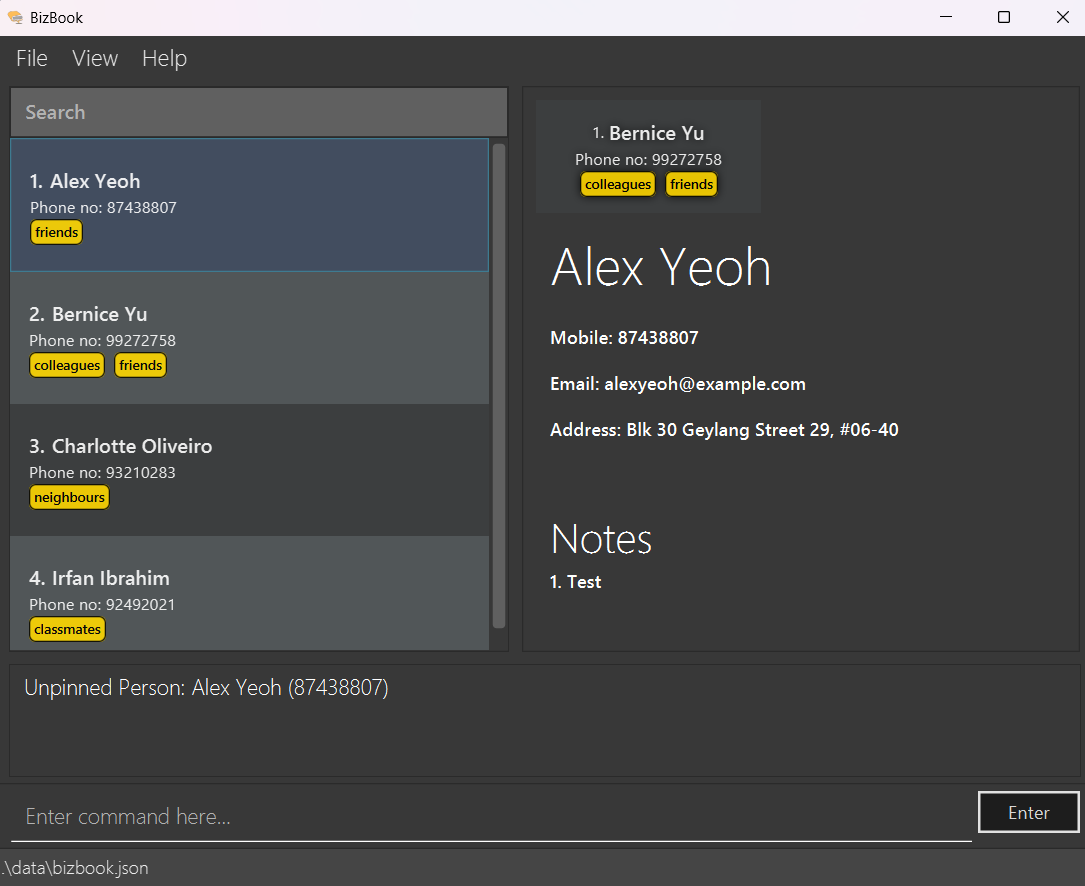
unpin 1unpins the contact of the first person shown on the pinned person list.
State beforeunpin 1:
State after unpin 1:
Undo a previously executed command: undo
Undoes the previous command that was executed.
Format: undo
- The undo feature saves the 5 most recent executed commands.
- The undo feature only tracks commands that modifies the address book.
- The undo feature will clear the focus person panel upon execution.
Examples of commands tracked by undo:
adddeletecleareditpin
Redo a previously executed undo command: redo
Redoes the previous undo command that was executed.
Format: redo
- The redo feature saves the 5 most recent executed undo commands.
- The redo feature only tracks changed made by the undo command
- The redo feature will clear the focus person panel upon execution.
Import a contact list : import
Imports a file containing contacts from a specified file type and overwrites all existing contacts with the imported data.
Format: import f/FILETYPE p/PATH
- Imports the contact list from the specified
FILETYPE. - The only supported file type currently is
vcf. - Support for paths that contain spaces are limited. In particular, if your path contains a space and an f ` f`, this may affect how the application parses the path. Instead, rename your folder and remove the spaces.
Examples:
-
import f/vcf p/bizbook.vcfimports the contacts from the filebizbook.vcfthat is located in the same folder as this application. -
import f/vcf p//Users/Name/myAddress.vcfimports the contacts from the file located at/Users/Name/myAddress.vcf
Export the contact list : export
Exports the contacts in the contact list into the specified file type. The file will be named bizbook.<file
extension> and will be located in the folder exports.
Format: export f/FILETYPE
- Exports the contact list into the specified
FILETYPE. - The file type must be either
csvorvcf.
Examples:
-
export f/csvexports the contact list into a csv file. -
export f/vcfexports the contact list into a vcf file.
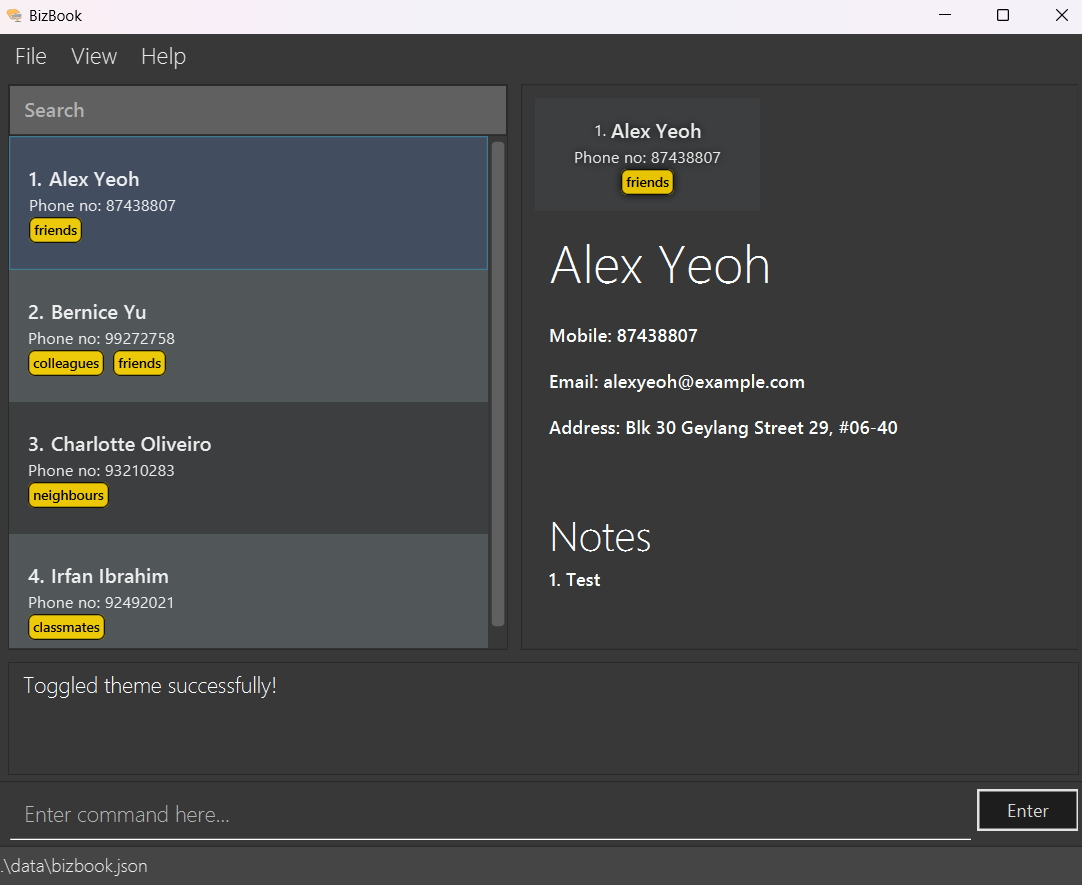
Change the application’s theme : toggle
Changes the application theme from light to dark or from dark to light.
Format: toggle
- If application is currently in light mode, toggle command will set it to dark mode.
- If application is currently in dark mode, toggle command will set it to light mode.
- Please note that our application does not save your theme preference, so it will always open in dark mode by default.
Examples:
-
togglechanges the application theme.
GUI in light mode:
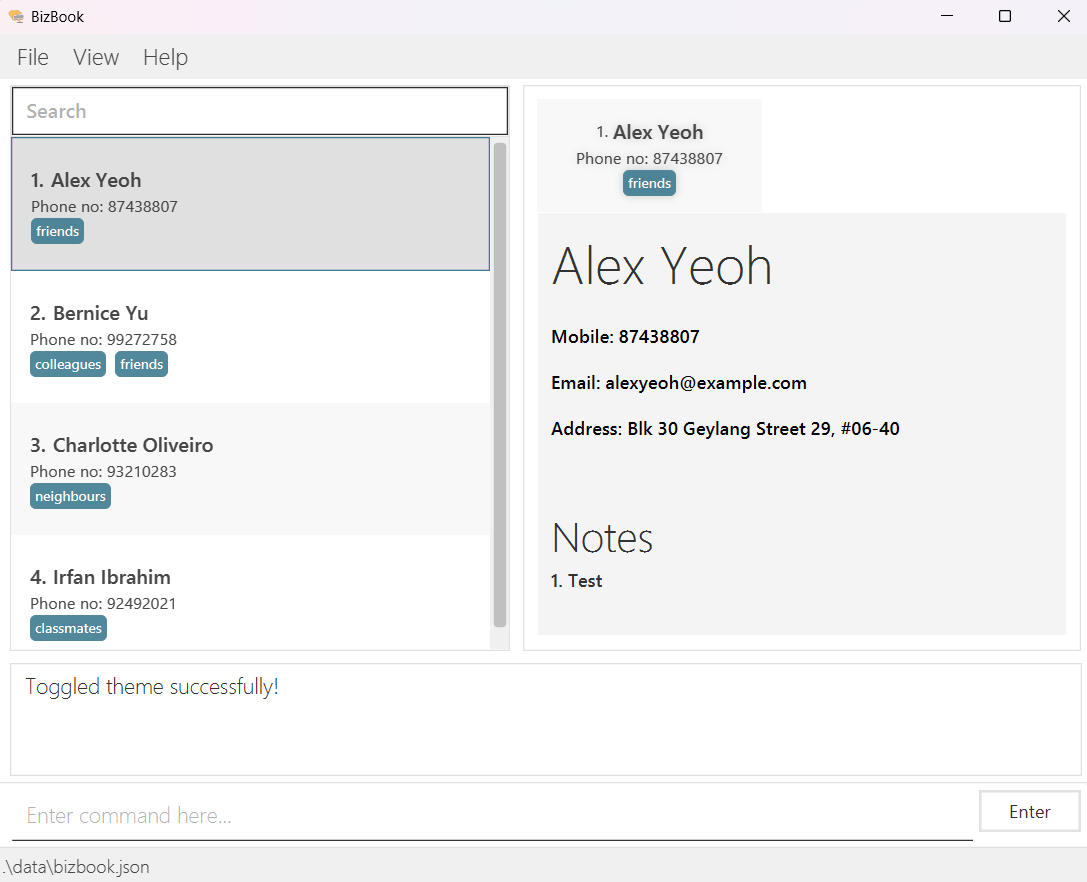
GUI in dark mode:
Navigating Command History :
Easily cycle through your previous successfully executed commands by using the Up and Down arrow keys on your keyboard.
Format: the Up and down arrow key on your keyboard
- Up Arrow: Pressing the Up arrow key allows you to scroll backward through your command history, one command at a time.
- Down Arrow: Pressing the Down arrow key moves forward through your command history, allowing you to revisit more recent commands.
Clear all entries : clear
Clears all entries from the address book.
Format: clear
Exit the program : exit
Exits the program.
Format: exit
Saving the data
BizBook data are saved in the hard disk automatically after any command that changes the data. There is no need to save manually.
Editing the data file
BizBook data are saved automatically as a JSON file [JAR file location]/data/bizbook.json. Advanced users are welcome to update data directly by editing that data file.
Furthermore, certain edits can cause BizBook to behave in unexpected ways (e.g., if a value entered is outside the acceptable range). Therefore, edit the data file only if you are confident that you can update it correctly.
FAQ
Q: How do I transfer my data to another Computer?
A: There are 2 ways to transfer data.
- If you want to use the
.jsonfile generated by BizBook, install the app in another computer and overwrite the data folder located at[JAR file location]/datawith the file that contains the data from your previous BizBook home folder. - If you want to import using a
.vcffile, export the data using theexportcommand in BizBook, i.e.export f/vcf. The.vcffile will be located in a folder at[JAR file location]/export/bizbook.vcf. You can rename and transfer this file to other devices using BizBook and to import the data use theimportcommand, i.e.import f/vcf p/[Path to the VCF file]/<file name>.vcf. Also do note that user preferences will not be transferred over.
Known issues
-
When using multiple screens, if you move the application to a secondary screen, and later switch to using only the primary screen, the GUI will open off-screen. The remedy is to delete the
preferences.jsonfile created by the application before running the application again. -
If you minimize the Help Window and then run the
helpcommand (or use theHelpmenu, or the keyboard shortcutF1) again, the original Help Window will remain minimized, and no new Help Window will appear. The remedy is to manually restore the minimized Help Window. - When you have extremely long tags, the UI will not be able to display your tags properly. Text may not wrap, it may cause some parts to have scroll bars. Please avoid using excessive or really long tag names.
-
Only one note may be added at a time. E.g.
addnote 1 n/High profile client. Ifaddnote 1 n/Supplier 1 n/Supplier 2is input, only the far right note will be added. If one wishes to add notes quicker, he/she may simply use the up-arrow feature to quickly re-enter the command as it requires fewer keystrokes than typing an additionaln/. - Maximum number of items, the maximum number of items (contacts, notes, tags, etc.) in this application is 2147483647. If you enter a number larger than this, the program may behave unexpectedly. However, it is unlikely that you will ever have so many contacts or tags of one contact.
- Contact name is a unique identifier, this application uses the name of a contact as the unique identifier. This means that it cannot accept two of the same names in the application. Instead, consider adding the surname, use full names or, if really needed, adding numbers at the back of the name to distinguish different people.
- Contact names are alphanumeric, this application only allows users to enter alphanumeric names. This means that names that include “s/o” or “d/o” are not allowed. Alternatively, consider using “so”, “do” or “son of” as a replacement.
- Notes are alphanumeric, similar to contact name, the notes do not allow special characters.
- Once selected, a person can’t be unselected, from either the contact list or pinned panel.
-
Notes with very long content will trail off with
..., instead of wrapping the text and displaying the hidden content on the next line. - Scrollbar in contact details appears when window is too small, despite there being no selected contact.
Command summary
| Action | Format, Examples |
|---|---|
| Add |
add n/NAME p/PHONE_NUMBER e/EMAIL a/ADDRESS [t/TAG]… e.g., add n/James Ho p/82224444 e/jamesho@example.com a/123, Clementi Rd, 1234665 t/friend t/colleague
|
| List | list |
| Edit |
edit INDEX [n/NAME] [p/PHONE_NUMBER] [e/EMAIL] [a/ADDRESS] [t/TAG]…e.g., edit 2 n/James Lee e/jameslee@example.com
|
| Find |
find KEYWORD [MORE_KEYWORDS]e.g., find James Jake
|
| Delete |
delete INDEXe.g., delete 3
|
| Deletetag |
deletetag INDEX t/TAG e.g. deletetag 1 t/Client
|
| Addnote |
addnote INDEX n/NOTE e.g. addnote 1 n/Customer 1
|
| Editnote |
editnote INDEX i/NOTE_INDEX n/NOTE e.g. editnote 1 i/1 n/Customer 1
|
| Deletenote |
deletenote INDEX i/NOTE_INDEX e.g. deletenote 1 i/1
|
| View |
view INDEX e.g. view 1
|
| Pin |
pin INDEX e.g. pin 1
|
| Unpin |
unpin INDEX e.g. unpin 1
|
| Undo | undo |
| Redo | redo |
| Toggle | toggle |
| Export |
export f/FILETYPE e.g. export f/csv
|
| Import |
import f/FILETYPE p/PATH e.g. import f/vcf p/myVcf.vcf
|
| Command History |
up & down arrow keys (only for successfully executed commands) |
| Clear | clear |
| Help | help |